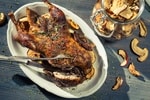
Delicious Smoked Duck
This smoked duck recipe is one of my favorite recipes to cook during the holidays.
Ingredients
Cure
- 3 tbsp Sugar
- 2 tsp Powdered Onion
- 2 tsp Poultry Seasoning
- 1 tsp Rubbed Sage
- 1 tsp Paprika
- 1 tsp Powdered Garlic
- 1 tsp Marjoram
- 1 tsp White Pepper
- 1 tsp Thyme
- 2 pieces Bay Leaves Cut into thin strips
Not everyone has poultry seasoning lying around, and some prefer to make their own, especially as it can often be cheaper! Here’s a recipe for homemade poultry seasoning.
Poultry Seasoning
- 2 tsp Ground Sage
- 1 1/2 tsp Ground Thyme
- 1 tsp Ground Marjoram
- 3/4 tsp Ground Rosemary
- 1/2 tsp Ground Black Pepper
- 1/2 tsp Nutmeg
For the poultry seasoning, all you do is mix all the ingredients thoroughly and store your seasoning in a clean spice bottle, tightly covered. You can make this seasoning beforehand, and then use 2 teaspoons of it in your cure.
Instructions
Early Preparation
-
The early prep takes place about a week before you plan to smoke your duck. First, you wash the duck (or ducks!) and remove any excess fat from the body, leaving the skin intact.
-
Pierce the thighs and breasts multiple times with a sharp fork. You should try to pierce the skin, but not the meat underneath. This helps release fat.
-
Mix the cure recipe together in a large bowl or container.
-
Then, rub the cure over the duck, both inside and out.
-
Cure the duck for six days in the refrigerator. While it’s curing, periodically continue to rub the cure over and inside the duck. This is to help ensure the cure will penetrate your duck and work as intended.
Secondary Preparation
-
The secondary preparation takes place one day before you mean to smoke your duck. First, rinse your duck with cool water and then blot dry. It’s important that the duck be entirely dry by the time it is smoked.
Tip: If you feel you have the time for it, instead of entirely drying your duck off with towels, at this point you can place the duck on a wire rack in the refrigerator and let it air dry for 24 hours. If you have less time, you can blow dry the duck with a hairdryer on a low temperature. This gives you a crispier skin.
-
Crumple up newspaper, and then wrap the newspaper in paper towels. Stuff the duck’s body cavity with the newspaper-towel combo.
-
Wrap the duck with paper towels, and then wrap it again with newspaper. It’s like a paper turducken!
-
Place paper towel and newspaper under your wrapped duck to absorb any fluids.
-
Store your duck overnight in the refrigerator like this.
Smoking Your Duck
-
Remember to leave yourself plenty of time before you want to eat, as smoking a duck can take a long time- this recipe asks for your duck to be in the smoker at varying temperatures for seven hours. There are a variety of ways to smoke a duck, but for this recipe we’re going with hot smoking, which cooks faster than some of the other options, and is best for beginners.
-
Before smoking your duck, remove the newspaper and towels that you wrapped it in last night.
-
The next thing you should do is secure the duck with butcher’s twine, and either hang or place the duck into the smoker, with the breast facing down. If you can hang your duck, putting it on a sturdy hook with the tail facing upwards will allow the smoke to penetrate the body cavity more easily. If you don’t want to hang your duck, simply placing it in the smoker also works just fine!
-
You should first dry the duck out in the smoker for an hour at 140° F. This is done with no smoke, just heat, and removes any unpleasant sliminess or stickiness on the skin.
-
Now you can smoke your bird! Smoke the duck for around three hours (using your chosen wood!) at the lowest possible temperature for your smoker. If you want to, you can place a drip pan underneath your duck, and later brush the bird with the fat from the drip pan.
-
After three hours, turn the temperature up to 150° F and smoke for three more hours.
-
After this, you can remove your duck from the smoker.
Cooking Duck In Oven
-
Preheat your oven to 350° F, and place the duck on an elevated war rack, and then place the rack into a pan. The pan needs to be at least an inch deep, in order to hold the melted fat!
-
Cover the pan with aluminum foil, and roast the duck until done. The internal temperature of your duck should reach 170° F, which can be monitored with a digital probe thermometer. When the duck’s done, it should also be easy to wiggle the drumsticks.
-
Take your duck out, and let it rest on a cutting board for five minutes before serving, to make sure it comes out as juicy as possible!
Recipe Notes
It’s important to note that not all smokers smoke evenly, and not all ovens cook evenly. As a result, different ducks in different places on the smoker or oven may not be done at the same time. Use you discretion, and deal with it bird by bird- when a duck is done, take it out, even if the others aren’t. A finished duck should have crisp skin, and be cooked through.