Let me tell ya something about Kansas City smoked brisket - it's not just a recipe, it's practically a religion in my household! I've been smoking meat since my 30s when my buddy Mike handed me a beer and said, "Dave, you're too old to not know how to smoke a proper brisket." That wake-up call changed my weekends forever. The Kansas City smoked brisket recipe I'm about to share has been refined through countless Saturday cook-offs, neighborhood competitions, and yes, a few spectacular failures that taught me more than any success.

Picking Your Meat: Not All Briskets Are Created Equal
Listen, you can't just waltz into any grocery store and grab whatever slab of meat they're calling "brisket." I learned this the hard way when I served what can only be described as beef jerky to my in-laws back in 2012. Talk about awkward!
For a proper Kansas City smoked brisket, you need a whole packer brisket with a decent fat cap. I'm talking about a beautiful 10-12 pound piece of meat that has both the point and the flat.
What's the difference? Think of it this way:
- The point: This fattier section is your flavor powerhouse. It's marbled throughout, which means it'll render down into those heavenly burnt ends that Kansas City made famous.
- The flat: This leaner, more uniform section gives you those Instagram-worthy slices that'll make your friends think you've gone pro.
When I'm at the butcher, I look for three key indicators of quality:
- Flexibility: If it's too stiff, it's probably been frozen too long or isn't fresh. A good brisket should bend slightly in the middle when you hold it up.
- Marbling: Those little white streaks of fat throughout the meat mean flavor and moisture. More marbling = more delicious.
- Fat cap: Aim for about ¼-inch thick. Too much and you're wasting money, too little and your meat'll dry out faster than my jokes at a PTA meeting.
Pro tip: Make friends with your local butcher. My guy, Tony, now texts me when he gets in prime briskets, and occasionally tosses in some beef ribs as a "test this for me" bonus.
The Kansas City Rub: Where Magic Happens
My buddy Steve once told me, "Dave, the difference between good brisket and great brisket is in the rub." He wasn't wrong (even though his fantasy football picks are TERRIBLE).
The Kansas City-style rub is what sets our brisket apart from Texas-style, which relies almost exclusively on salt and pepper. Our KC approach brings layers of flavor that develop and deepen during the long smoke. Think of it as the difference between a one-note song and a full symphony.
My go-to KC rub includes:
- ¼ cup kosher salt (Diamond Crystal, not table salt)
- ¼ cup sugar (creates that gorgeous bark)
- 2 tablespoons chili powder
- 2 tablespoons dry mustard powder
- 2 tablespoons sweet paprika
- 2 tablespoons granulated garlic
- 2 tablespoons granulated onion
- 2 tablespoons dried granulated lemon peel (my secret weapon!)
- 1 tablespoon ground black pepper
- 1 tablespoon ground white pepper
- 1 tablespoon cayenne pepper
Mix this thoroughly in a bowl, breaking up any clumps. The resulting rub should be uniform in color and texture. Make extra – it stores well in an airtight container for months and works on everything from chicken to pork.
The Low and Slow Gospel: Smoking Techniques That Don't Suck
Here's where the patience comes in, folks. You can't rush a good brisket anymore than you can rush my teenage daughter in the bathroom in the morning (which is to say, IMPOSSIBLE).
The key is maintaining a steady 250°F throughout the cook. Temperature stability is your holy grail. Just 25 degrees too hot, and you'll end up with dry, tough meat. Too cool, and you'll be serving dinner for breakfast the next morning.
The Dreaded Stall: BBQ's Psychological Warfare
Let me tell ya about "the stall" - that maddening period around 150-160°F where your brisket temperature just... stops... rising. The first time it happened, I was convinced my thermometer was broken. I may have had a minor meltdown in front of the smoker while my wife watched from the kitchen window, laughing.
What's actually happening is evaporative cooling - as moisture comes to the surface of the meat and evaporates, it cools the meat at roughly the same rate your smoker is heating it. It's like running on a treadmill - lots of energy being expended but you ain't going nowhere.
The stall can last 2-4 hours, which is enough time to question all your life choices. Stay strong. This is where greatness is forged.
The Snake Method (For Us Weber Grill Diehards)
Before I invested in a proper smoker, I used my trusty Weber kettle grill with the "snake method." Here's how it works:
- Arrange unlit charcoal briquettes in a C-shape around the perimeter of the grill, 2-3 briquettes wide and 2 high.
- Place wood chunks on top of the charcoal at intervals.
- Light just 8-10 briquettes in a chimney starter.
- Once lit, place them at one end of the "snake."
- Position a water pan in the center.
- Place your brisket on the grate, opposite the lit end.
The charcoal will slowly burn around the "snake" like a fuse, maintaining a low, steady temperature for 8+ hours with minimal intervention. It's brilliant in its simplicity and perfect for beginners.

Wood Selection: Because Flavor Matters, People!
Don't just grab whatever wood you've got lying around from last year's tree trimming (learned this one the hard way when I used pine once... BIG mistake. Everything tasted like turpentine, and my brother-in-law still brings it up at family gatherings).
Think of smoke as an ingredient, not just a cooking method. Different woods impart different flavors:
- Hickory: The traditional Kansas City choice. Strong and bacon-like. Use it as your primary smoke wood.
- Oak: Steady and reliable with a medium smoke profile. Great for long cooks because it won't overpower.
- Cherry/Apple: Adds subtle sweetness and a gorgeous mahogany color to the bark.
- Pecan: The perfect middle ground between hickory and the fruit woods.
My winning combination: 60% oak for the steady heat, 30% hickory for that classic flavor, and 10% cherry for color and sweetness. Use chunks, not chips, for longer cooks – chips burn up too quickly.
The Great Debate: To Wrap or Not To Wrap?
The Texas Crutch (wrapping your brisket partway through) is controversial in some BBQ circles. It's like bringing up politics at Thanksgiving dinner - people have STRONG opinions.
Here's the truth: wrapping serves two purposes:
- It speeds up the cook by helping power through the stall
- It retains moisture that would otherwise evaporate
I'm pro-wrap, because I value my time and sanity. After 5-6 hours of smoking, when that brisket hits around 165°F internal temp, I wrap that bad boy in pink butcher paper (NOT aluminum foil – foil can steam your carefully crafted bark into mush).
The paper lets the meat breathe a bit while still speeding up the cook. My neighbor Jerry refuses to wrap his brisket and spends approximately 18 hours babysitting his smoker. Meanwhile, I'm enjoying a cold beer and catching the game while my brisket finishes up in a tidy 12 hours.
The choice is yours, but remember: the best brisket is the one that gets done when your guests are hungry, not four hours later.
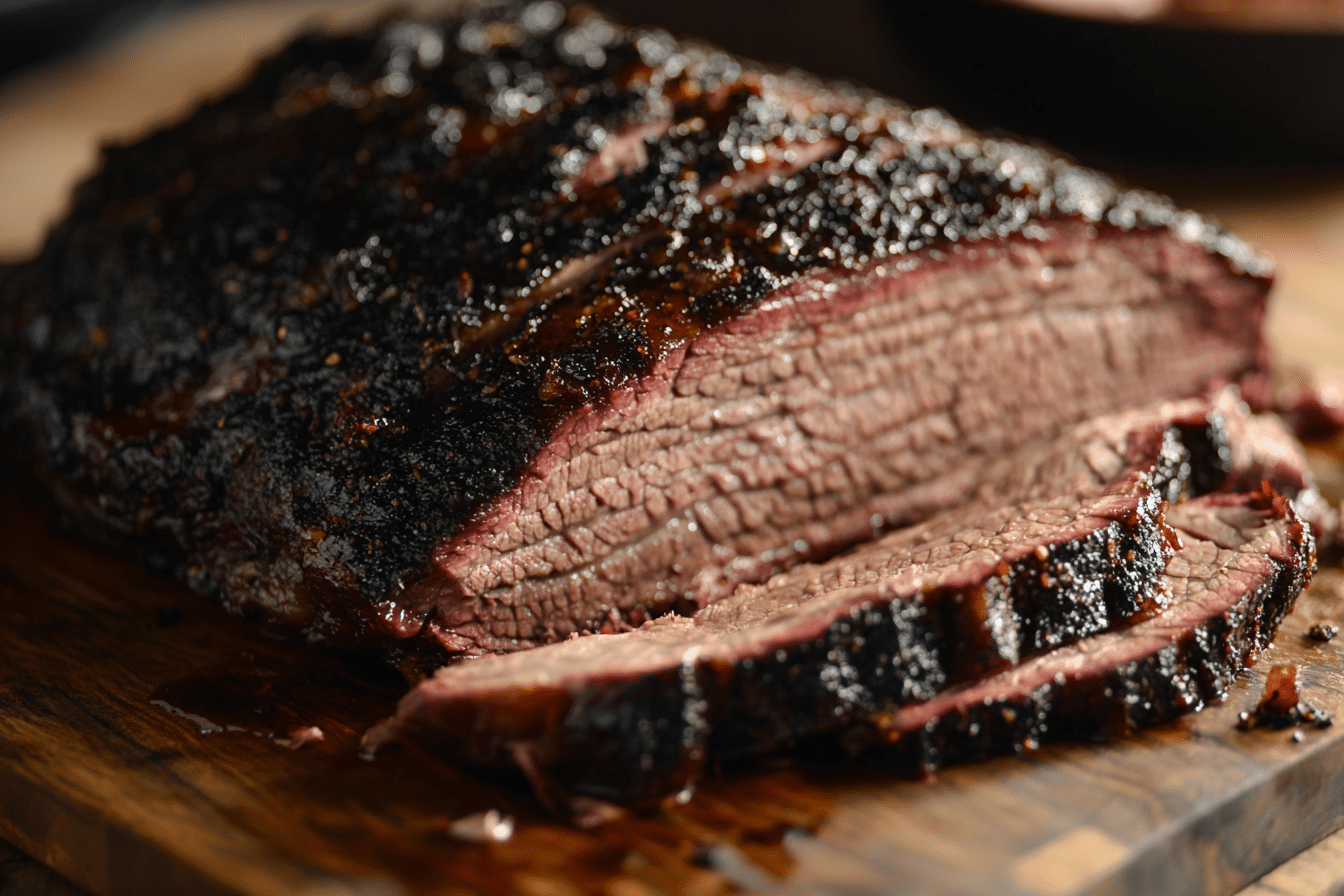
Burnt Ends: The Candy of the BBQ World
Listen up, because this is important: burnt ends are NOT just diced brisket. Anyone who tells you otherwise should have their BBQ privileges revoked immediately.
Proper Kansas City burnt ends come from the point section of the brisket. After the initial cook, you:
- Separate the point from the flat
- Cube the point into 1-inch chunks
- Toss in more rub and a touch of sauce
- Return to the smoker for another 1-2 hours
This transforms them into concentrated flavor bombs where the fat, protein, and sugars caramelize into something transcendent. The texture should be firm enough to hold together but tender enough to yield with gentle pressure.
The first time I had proper burnt ends was at Joe's Kansas City BBQ, and I swear I saw God. My kids make fun of the involuntary noises I make while eating them, but I regret nothing.
Tips From My Many, MANY Failed Attempts
Over the years, I've made every brisket mistake possible. I've turned $75 cuts of meat into something my dog wouldn't eat. But that's how we learn, right?
Trimming Like You Mean It
Don't be shy with that knife when trimming. You want about ¼ inch of fat cap - enough to protect and baste the meat, but not so much that people are cutting around fat chunks.
Key areas to trim:
- Hard fat between the point and flat (it won't render)
- The hard fat seam on the bottom of the flat
- Any silver skin or loose pieces
- Round the edges for more even cooking
A sharp knife makes all the difference. I sharpen mine before every brisket trim – it's a ritual that forces me to slow down and respect the process.
Temperature Control: The BBQ Zen Garden
Maintaining consistent temp is like meditation - it requires focus, patience, and occasionally threatening your equipment. Some practical tips:
- Start with a clean smoker – buildup affects airflow
- Use water pans to stabilize temperature and add humidity
- Make small vent adjustments and wait 15 minutes before adjusting again
- Keep the lid closed! "If you're lookin', you ain't cookin'"
- Get a dual-probe thermometer – one for the meat, one for the smoker
- Log your cooks in a notebook – patterns emerge over time
I check my smoker temps every hour or so, adjusting vents as needed. It's become such a habit that I once found myself adjusting the vents on our gas grill out of pure muscle memory.
The Rest Is Not Optional, People!
After your brisket reaches that magical 190-195°F, DO NOT, under any circumstances, slice into it immediately! This was my cardinal sin for years.
You MUST let it rest for at least an hour, preferably two. During this time, several important things happen:
- The muscle fibers relax and reabsorb juices
- The internal temperature equalizes
- The proteins set, making slicing cleaner
- Carryover cooking finishes the process
I wrap mine in butcher paper, then a towel, then place it in a cooler (without ice, obviously). This makeshift Cambro will keep your brisket warm for 4+ hours if needed, perfect for event planning.
Sides That Make The Experience Complete
A great brisket deserves great sides. My go-to lineup includes:
- Cheesy corn bake: Corn kernels mixed with cream cheese, cheddar, and heavy cream, then baked until bubbly. Add jalapeños for kick.
- Tangy coleslaw: The acid cuts through the rich meat. Mine uses apple cider vinegar, a touch of sugar, and celery seeds.
- Baked beans with burnt end chunks: The perfect way to use up any less-than-perfect pieces of brisket.
- Mac and cheese: Use smoked gouda for another layer of flavor that complements the meat.
Pair it all with an ice-cold Boulevard Wheat beer, and you've got yourself a Kansas City feast that'll make people forget about whatever diet they're pretending to be on.
Overall, smoking a Kansas City brisket isn't just cooking - it's an event, a lifestyle, a commitment. It's about patience, fire management, and the willingness to stay up all night tending to meat like it's a newborn baby.
The best part? Even "failed" brisket attempts are usually still pretty darn good. As my dad used to say, "There's no such thing as bad barbecue, just barbecue that needs more sauce."
OTHER RECIPES YOU'LL LOVE
Kansas City Smoked Brisket Recipe
Ingredients
- 1 10-12 pound whole packer brisket
- ½ cup yellow mustard
- ¾ cup Kansas City-style barbecue rub recipe above
- Butcher paper for wrapping
- Your favorite Kansas City-style barbecue sauce for serving
Instructions
- Prepare the Brisket: Trim the fat cap to ¼ inch thick. Remove any silver skin or excess fat from the top of the brisket. Talk soothingly to the meat as you do this - it helps. (Kidding. Sorta.)
- Apply the Rub: Coat the brisket with a thin layer of yellow mustard (trust me on this one). Generously apply the rub to all sides of the brisket, patting it in firmly. Let it sit for about 30 minutes while you prepare your smoker.
- Preheat the Smoker: Get your smoker running steadily at 250°F. Add your choice of hardwood - I use a mix of oak and cherry.
- Smoke the Brisket: Place that beautiful hunk of meat in the smoker, fat side up. Close the lid and resist the urge to peek for at least 3 hours (this is where having a remote thermometer saves marriages).
- The Waiting Game: Smoke for about 5-6 hours, or until the internal temperature reaches 165°F. This is where the stall usually happens, so prepare yourself mentally.
- Wrap It Up: Once you hit 165°F, wrap the brisket tightly in butcher paper. Return it to the smoker and continue cooking until the internal temperature reaches 190-195°F in the thickest part of the flat. This'll take another 3-5 hours.
- The Essential Rest: Remove from the smoker, keep it wrapped, and let it rest for AT LEAST an hour. Two is better. I wrap mine in an old towel and place it in a cooler.
- Slice Against the Grain: Remember, the grain changes direction between the point and the flat. I slice the flat against the grain for perfect slices, and cube the point for burnt ends or just chunkier pieces.
- Serve and Accept Compliments: Serve with sauce on the side (never directly on the meat - that's BBQ blasphemy), pickles, sliced white bread, and your favorite sides.
Leave a Reply